Getting Started With Your Solar System
Congratulations on officially becoming a solar owner! We’re thrilled to welcome you to the movement toward a cleaner, more sustainable future.
To help you get the absolute most out of your clean energy, we’ve put together this quick guide to perfect your setup. Select your battery storage system below to learn how to:
- Connect seamlessly to your home Wi-Fi.
- Configure your tariff to maximise your daily savings.
- Access manufacturer best practices tailored specifically to your system.
Downloading The App
If you haven’t already, you can get the Tesla App by scanning the relevant QR Code below.
 Connecting to Wi-Fi for the first time
- In the Tesla app, locate your home energy site.
- Select ‘Network Setup.’
- Select your preferred Wi-Fi network.
- Enter your Wi-Fi network password.
- Your Powerwall is officially connected to Wi-Fi once you see a confirmation message on the screen.
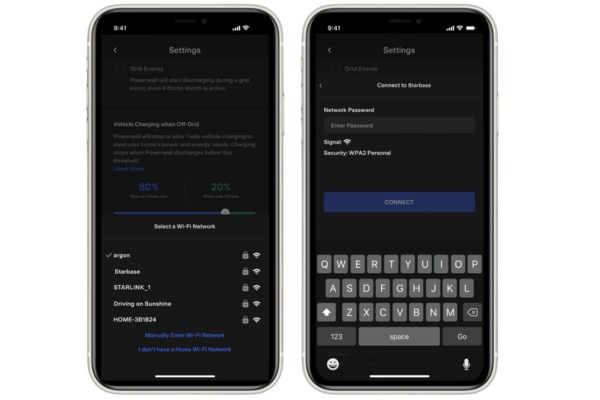
To change your existing Wi-Fi Connection
- In the Tesla app, locate your home energy site.
- Select ‘Settings.’
- Select ‘Configure Wi-Fi’ at the bottom of the screen.
- Select the Wi-Fi network you would like your Powerwall connected to.
Troubleshooting
If the connection to the Powerwall Wi-Fi network fails, reset your Gateway or Powerwall, wait five minutes and try again.
A Wi-Fi signal strength between two or three bars is required for successful connection to your home network. If a signal strength of two or three bars is not achieved, relocate your access point.
View Tesla’s ‘Connecting Powerwall to Wi-Fi’ page here
Setting Up Tariffs
To set up tariffs in your Tesla Powerwall 3, open the Tesla app, navigate to Settings > Utility Rate Plan, and select your energy provider. If your specific tariff is not listed, you can build a custom rate plan by entering your peak/off-peak hours, buy rates, and export prices manually.
For a step-by-step approach to entering your rate structures:
- Access Settings: Open the Tesla app, go to Settings, and tap Utility Rate Plan.
- Find Your Plan: Tap Start (or Start Over) and search for your energy provider. If it appears, select it and follow the prompts.
- Create a Custom Plan: If your supplier isn’t listed, tap More Options and select Custom Rate Plan.
- Input Details: Enter your supplier and plan name. Choose whether your pricing is based on Time of Use or Seasons.
- Set Rate Periods: Drag the sliders to set your peak, off-peak, and shoulder hours (such as super off-peak). Enter the exact buy and sell (export) rates for each time window.
- Enable Time-Based Control: Go back to the Powerwall menu in Settings. Under Operational Mode, choose Time-Based Control. This allows the system to pull cheaper grid power to charge the battery during off-peak windows and use it—or export it—when rates are high.
If you use an agile or smart-tariff (such as Octopus Energy in the UK), you may be able to link your account directly via their app (e.g., in the Octopus app, go to Devices > Add Device > Tesla). This will automate the process, but keep in mind that doing so will hand direct tariff control of your battery over to the energy supplier’s software
View Tesla’s ‘Energy Tariffs’ page here.
Need Help?
You can contact the Tesla support team by calling 01628 450 630 or visting the ‘contact us‘ page on their website.
Downloading The App
If you haven’t already, you can get the mySigen app by scanning the relevant QR Code below.
 Connecting To Wifi
Connecting to Wi-Fi is essential for Sigenstor systems as it ensures the unit remains connected to the Sigenergy cloud, which provides you with real time monitoring and update capabilities.
- Open the mySigen app and tap Settings in the bottom right corner.
- Click the System Settings button.
- Click the Connectivity button.
- Click the WLAN button.
- Choose a suitable WLAN and enter your password.
Setting Up Tariffs
Setting up tariffs in your SigenStor system is done via the mySigen app. You can either input fixed and Time-of-Use (TOU) rates manually or link the system to a dynamic tariff so Sigen AI can automatically charge the battery when grid prices are low.
Method 1: Manual Tariff Setup
If you have a fixed rate or a standard day/night tariff, you can program the rates and periods yourself.
- Open the mySigen app and tap Settings in the bottom right corner.
- Go to Grid Settings (or Utility Rate Plan) and select Add My Rate Plan.
- Enter your utility provider’s name and select the type of plan.
- Choose Time of Use (TOU) and tap Next.
- Input your buying rate (cost from the grid) and your selling rate (feed-in tariff).
- Use the scheduling tools to assign different rates to specific hours, weekdays, or seasons.
- Save the plan, ensuring your system is set to Time-based Control or Sigen AI Mode to apply the scheduling.
Method 2: Dynamic Tariff Setup
If you are on a dynamic tariff (like Octopus Agile) that changes pricing regularly, Sigen AI can sync with these live prices.
- Go to Current Mode > Sigen AI Mode.
- Tap the pencil or settings icon next to My Rate Plan.
- Under the utility section, choose Dynamic Tariff.
- Select your utility company (e.g., Octopus) and region/tariff from the available list.
- Tap Next and ensure you allow the system to import dynamic rates.
- Choose a preferred operating strategy (e.g., Profit Max or Balance Energy) and hit Confirm and Activate.
Need Help?
You can contact the Sigenergy support team by calling +44 204 585 0338 or visting emailing [email protected] page on their website.
Downloading The App
If you haven’t already, you can get the FoxCloud App by scanning the relevant QR Code below.

Connecting To Wi-Fi
- Go to Me screen and tap “WLAN Configuration”.
- Wait for the system to search for available devices. Once complete, select the devices you want to connect and tap “Connect Network”.
- Select the Wi-Fi and enter password, then tap “Next” (Note: If your WIFI is 5G Hz, please set it to 2.4G Hz, otherwise, network configuration may fail).
- Wait for the system to connect the devices to the network. Once successful, click “Finish”.
Full instructions with screenshots can be found on Page 24 of the Fox User Manual
Setting up your Tariffs
To set up your FoxESS system for an off-peak electricity tariff, use the Mode Scheduler in the FoxESS Cloud. This allows you to program “Force Charge” windows so your battery charges from the grid during cheap nighttime hours, and “Force Discharge” windows to avoid peak costs.
Setting up Time-of-Use Charging
- Access the App: Open the FoxCloud 2.0 app or website and log in.
- Open Scheduler: Navigate to Quick Settings > Mode Scheduler.
- Add a Time Slot: Tap the + to add a schedule.
- Configure Force Charge: Set the mode to Force Charge, select your off-peak hours (e.g., 00:30 to 05:30), ensure Enable Charge From Grid is ticked, and save.
- Configure Force Discharge (Optional): Add a second schedule for Force Discharge during expensive peak hours (e.g., 16:00 to 19:00) so your home runs on battery rather than expensive peak grid power.
Setting Up Smart Tariff Automation
If you use Octopus Energy, you can bypass manual scheduling completely by linking your account directly to Intelligent Octopus Flux or similar smart integrations.
- Open the Octopus Energy app.
- Go to Devices > Add Device and select FoxESS.
- Log in using your FoxCloud credentials.
The smart platform will then take control, automatically charging your battery when energy is cheapest and even factoring in negative electricity pricing.
Full instructions with screenshots can be found on Page 52 of the Fox User Manual
Updating Your Tariff Rates
To ensure your app correctly calculates your financial savings based on your specific plan:
- Log into your account via the FoxESS Cloud Portal.
- Go to My Sites and find your system in the Sites List.
- Click the green search/view icon, then click the Edit (pen/paper) icon under More Options.
- Update your import/export pricing here to reflect your exact tariff rates.
Need Help?
You can contact the Fox support team by calling 020 7052 3472 or emailing [email protected].
Downloading The App
If you haven’t already, you can get the AlphaESS app by scanning the relevant QR Code below.

Wi-fi Configuration
Connecting your AlphaESS battery system to Wi-Fi is essential for transforming it from a static piece of hardware into an intelligent, energy-managing asset. By enabling connectivity, you unlock the full potential of your solar storage system.
The below video put together by AlphaESS provides a comprehensive overview of connecting to Wi-Fi.
Tariff Set Up
Connecting your AlphaESS system to your local electricity tariff structure is one of the most effective ways to accelerate your return on investment. By configuring these settings in the AlphaCloud portal or mobile app, you enable the system to shift from simple “self-consumption” to intelligent, cost-aware energy management.
The below video put together by AlphaESS provides a comprehensive overview of Tariff & Finanical Infromation. Pressing play should take you to 07:13, where this section begins to tackle set up of Tariffs.
Need Help?
You can contact the AlphaESS support team by calling 01628 450 630, emailing [email protected], or visiting their webpage for essential help guides.
Downloading The App
If you haven’t already, you can get the EcoFlow App by scanning the relevant QR Code below.
Connecting To Wi-fi
Getting your EcoFlow battery connected to Wi-Fi is the key to unlocking smarter energy management for your home. By connecting to the internet via the EcoFlow app, you gain access to features like EcoFlow Intelligent Mode (also known as AI Mode) allowing you to maximise solar energy and shrink your bills.
- Open EcoFlow App.
- Go to Settings.
- Click Internet Connection.
- Select desired Wi-Fi connection, enter password to complete connection.
Click to learn how to connect your EcoFlow battery to the internet
Setting Up Tariffs
Ecoflow systems integrate seamlessly with Time-of-Use (TOU) and dynamic energy tariffs to maximise your solar potential. By using EcoFlow’s smart app, you can program your battery to charge from the grid when rates are cheapest and use that power during peak, high-cost hours.
- Click Automation.
- Go to TOU setting.
- Choose your device.
- Set different tasks based on tariff.
- Set time periods.
- Choose charge or discharge and set the power limit.
- The schedule can also be repeated as needed
- Save the setting.
Click to learn about setting up time based tarrifs for your EcoFlow Battery
Intelligent Mode
EcoFlow Intelligent Mode (often called AI Mode) is an automated energy management setting for EcoFlow users. It uses artificial intelligence to optimize your power use, lower electricity bills, and maximised solar potential.
- Go to Settings and check your firmware version. Make sure it’s 5.1.27.61 or above.
- Tap Operating Mode, then select AI Mode Premium.
- Set up your electricity rate plan. Tap Electricity Rate, then the + icon, and choose Quick Setup.
- Select your utility provider. you can choose from the exisiting list or enter your location.
- For some providers, you’ll need to enter your login info. For others you may need to input taxes and markup.
- Once your rate plan is confirmed, you can activate AI Mode Premium. The system will the automatically create a personalised energy plan.
Click to learn about using Intelligent Mode and setting up your electricity rate plan
Need Help?
You can contact the Fox support team by calling 0808 8126 006 or emailing [email protected].
Page Updated Summer 2026
